Table of Contents
- Freequently Asked Questions
- How do I connect a CNC shield with an Arduino?
- What are the benefits of connecting a CNC shield with an Arduino?
- What programming language is used to control a CNC shield with an Arduino?
- What should I do if my CNC shield is not communicating with my Arduino?
- Can I connect multiple CNC shields to one Arduino?
If you are an enthusiast of CNC machines and want to build your own, you must have heard about CNC shield and Arduino. CNC shield is a printed circuit board that connects with the Arduino board and allows you to control stepper motors and other devices. However, connecting CNC shield with Arduino can be a bit tricky, especially for beginners. In this article, we will guide you through the process and make it easy for you to connect CNC shield with Arduino.
Before we start, you need to have a basic understanding of the Arduino board and CNC shield. CNC shield is designed to work with Arduino Uno, which is a microcontroller board based on the ATmega328P. It is the most popular board among the Arduino family due to its simplicity and versatility. CNC shield, on the other hand, is a board that can be used to control stepper motors and other devices used in CNC machines. So, let’s get started and learn how to connect CNC shield with Arduino.
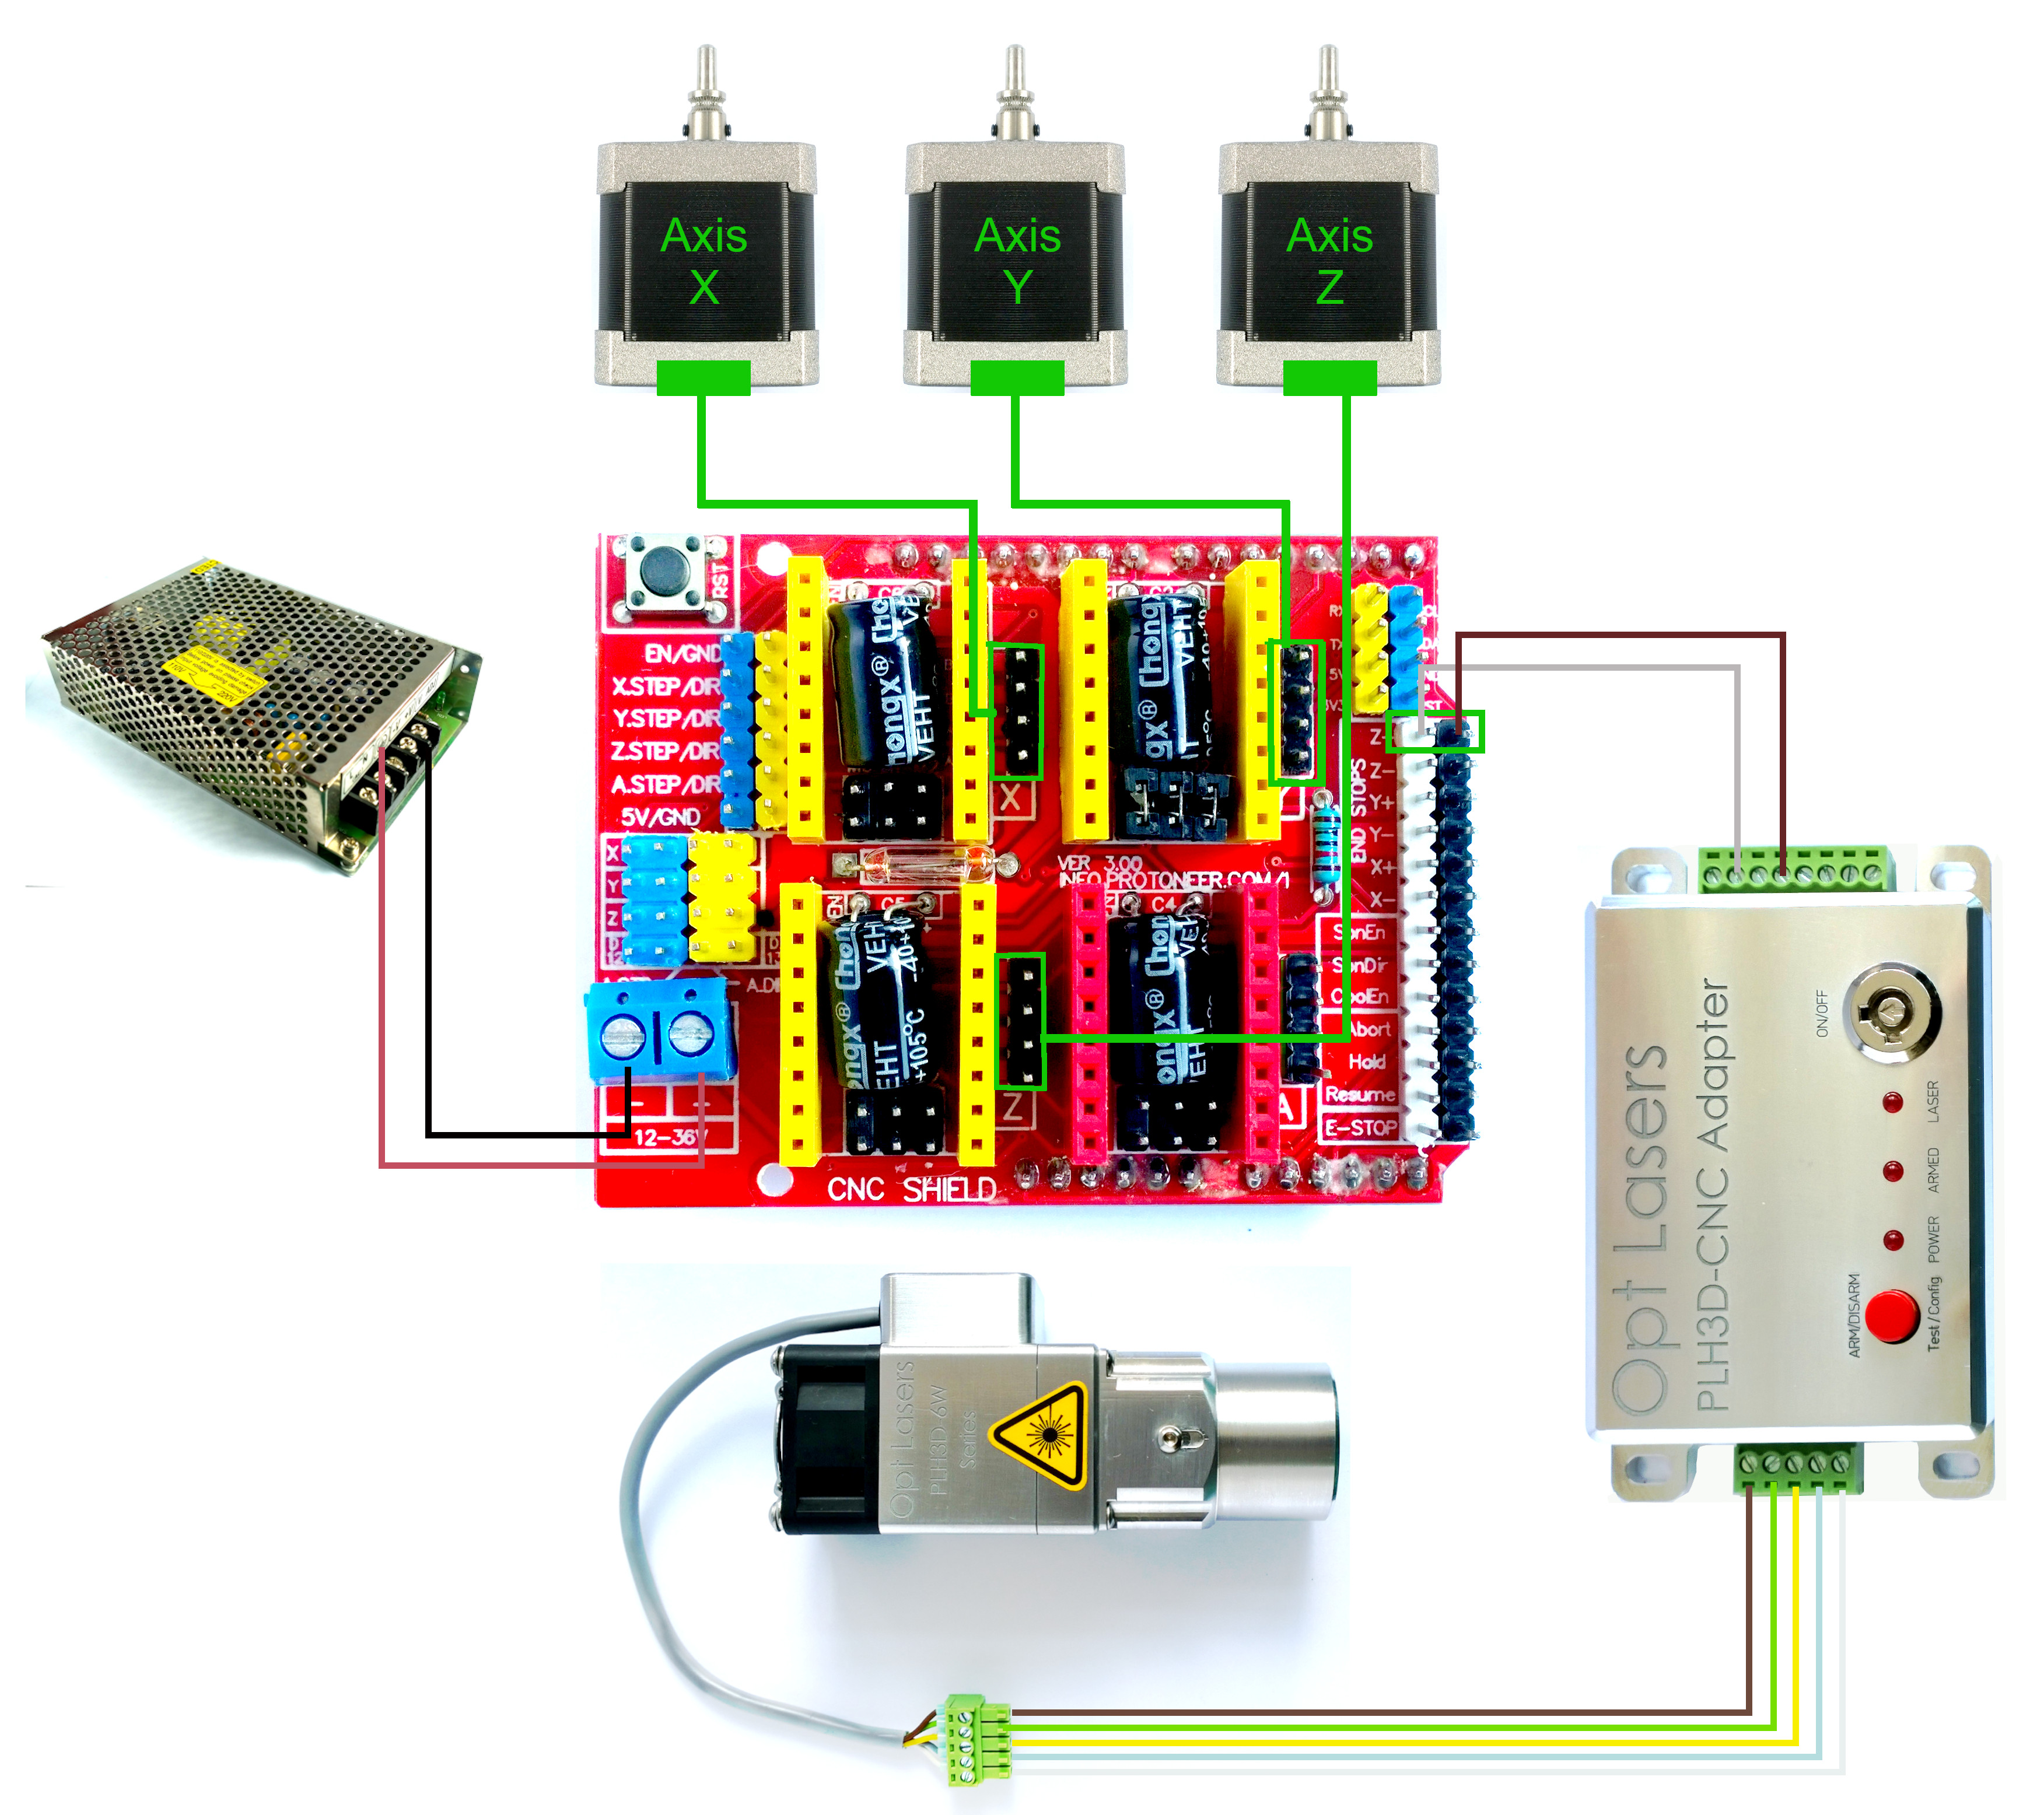
To connect a CNC shield with Arduino, follow these simple steps:
- First, attach the CNC shield to the Arduino board.
- Next, connect the stepper motors to the CNC shield.
- Connect the power supply to the CNC shield.
- Connect the spindle and limit switches to the CNC shield.
- Finally, upload the appropriate firmware to the Arduino board.
How to Connect CNC Shield With Arduino?
CNC (Computer Numerical Control) machines are widely used in the manufacturing industry to automate the machining process. These machines are controlled by a computer and require a CNC shield to interface with an Arduino microcontroller. In this article, we will guide you through the process of connecting a CNC shield with an Arduino board.
H3: Gather the Required Components
Before you start connecting the CNC shield with the Arduino board, you need to gather the following components:
– Arduino board (Uno, Nano, or Mega)
– CNC Shield v3
– Stepper motor drivers (A4988 or DRV8825)
– Stepper motors
– Power supply (12V DC)
H3: Connect the Stepper Motor Drivers
The stepper motor drivers are used to control the movement of the stepper motors. To connect the stepper motor drivers, follow these steps:
1. Identify the pins on the CNC shield labeled “X, Y, Z, and A.”
2. Insert the stepper motor drivers into the corresponding slots on the CNC shield.
3. Ensure that the jumper caps on the stepper motor drivers are properly configured for your motor type (bipolar or unipolar).
H3: Connect the Stepper Motors
The stepper motors are responsible for moving the CNC machine’s axes. To connect the stepper motors, follow these steps:
1. Identify the pins on the CNC shield labeled “X, Y, Z, and A.”
2. Connect the stepper motors to the corresponding pins on the CNC shield.
3. Ensure that the motor’s wires are correctly connected to the stepper motor driver.
H3: Connect the Power Supply
The power supply is required to power the CNC shield and the stepper motors. To connect the power supply, follow these steps:
1. Identify the power input on the CNC shield.
2. Connect the positive (+) and negative (-) wires from the power supply to the corresponding pins on the CNC shield.
H3: Connect the Arduino Board
The Arduino board is responsible for sending commands to the CNC shield to control the stepper motors’ movement. To connect the Arduino board, follow these steps:
1. Identify the pins on the CNC shield labeled “EN, DIR, and STEP.”
2. Connect the EN, DIR, and STEP pins on the CNC shield to the corresponding pins on the Arduino board.
3. Ensure that the pins are connected to the correct digital pins on the Arduino board.
H3: Upload the GRBL Firmware
The GRBL firmware is required to communicate with the CNC shield and control the stepper motors’ movement. To upload the GRBL firmware, follow these steps:
1. Download the latest version of the GRBL firmware from the official website.
2. Connect the Arduino board to your computer using a USB cable.
3. Open the Arduino IDE software and select the correct board and port.
4. Upload the GRBL firmware to the Arduino board.
H3: Configure the GRBL Settings
The GRBL settings determine the CNC machine’s behavior, such as the motor’s speed and acceleration. To configure the GRBL settings, follow these steps:
1. Open the serial monitor in the Arduino IDE software.
2. Type “$” and press enter to display the GRBL settings.
3. Modify the settings as required using the correct syntax.
4. Type “$” and press enter to save the settings.
H3: Test the CNC Machine
After connecting the CNC shield with the Arduino board and configuring the GRBL settings, it’s time to test the CNC machine. To test the CNC machine, follow these steps:
1. Open the serial monitor in the Arduino IDE software.
2. Type “G00 X10 Y10 Z10” and press enter to move the CNC machine’s axes to the specified position.
3. Type “G01 X20 Y20 Z20 F500” and press enter to move the CNC machine’s axes to the new position at a speed of 500mm/min.
H3: Benefits of Using a CNC Machine
Using a CNC machine has several benefits, such as:
– Increased accuracy and precision
– Higher production speed
– Reduced labor costs
– Flexibility in design and manufacturing
H3: CNC Shield Vs. Other Controllers
Compared to other CNC machine controllers, the CNC shield has several advantages, such as:
– Easy to use and configure
– Cost-effective
– Widely supported by the maker community
– Compatible with different Arduino boards
Conclusion
Connecting a CNC shield with an Arduino board is a straightforward process that requires some basic knowledge of electronics and programming. By following the steps outlined in this article, you can easily set up your CNC machine and start machining parts with high accuracy and precision.
Freequently Asked Questions
How do I connect a CNC shield with an Arduino?
To connect a CNC shield with an Arduino, you will need to follow a few simple steps. Firstly, ensure that your Arduino is switched off and disconnected from any power source. Next, you will need to locate the pins on your CNC shield and align them with the corresponding pins on your Arduino. Once you have done this, you can securely connect the two by pushing the CNC shield onto the Arduino board. Finally, you can power up your Arduino and CNC shield and begin programming.
It is important to note that different CNC shields may have slightly different pin layouts, so it’s important to refer to the manufacturer’s instructions for specific guidance. Additionally, it is crucial to ensure that your CNC shield and Arduino are compatible and rated to handle the same voltage and amperage requirements to avoid any damage or safety risks.
What are the benefits of connecting a CNC shield with an Arduino?
Connecting a CNC shield with an Arduino offers many benefits. Firstly, it allows you to control a CNC machine with precision and accuracy, as you can program the Arduino to execute specific movements and tasks. This level of control can lead to improved efficiency and productivity in CNC machining processes.
Another benefit is that using an Arduino allows you to easily make modifications to your CNC machine. This is because the Arduino is an open-source platform, which means that you can easily access and modify the source code to suit your specific needs. This flexibility can be especially useful for hobbyists or those working in prototyping or small-batch production.
What programming language is used to control a CNC shield with an Arduino?
The programming language used to control a CNC shield with an Arduino is typically G-code. This is a language used in the CNC machining industry to control the movements of machines. It consists of a series of commands that are sent to the CNC machine to dictate how it should move and operate.
To program an Arduino to control a CNC machine using G-code, you will need to use specialized software, such as GRBL or Mach3. These programs allow you to create and edit G-code programs, which can then be uploaded to the Arduino and executed.
What should I do if my CNC shield is not communicating with my Arduino?
If your CNC shield is not communicating with your Arduino, there are a few things you can try. Firstly, ensure that your wiring is correct and that your CNC shield and Arduino are securely connected. Additionally, check that your power supply is supplying enough voltage and amperage to both the CNC shield and Arduino.
If these basic checks do not solve the issue, you may need to troubleshoot your hardware or software. This could involve checking for any loose connections, updating firmware or drivers, or replacing faulty components. It may also be helpful to consult online forums or communities for advice from experienced users.
Can I connect multiple CNC shields to one Arduino?
Yes, it is possible to connect multiple CNC shields to one Arduino. However, it is important to note that this will require careful planning and configuration to ensure that each shield is receiving the correct signals and power.
To connect multiple CNC shields, you will need to ensure that they are all compatible with the same version of Arduino and that they are all using the same pin layout. Additionally, you will need to configure the software and programming to ensure that each shield is receiving the correct commands.
It is worth noting that connecting multiple CNC shields to one Arduino may increase the risk of electrical interference or overloading, so it’s important to carefully monitor the voltage and amperage requirements of each component.
In conclusion, connecting a CNC shield with an Arduino can seem like a daunting task, but it is actually quite simple once you understand the steps involved. By following the guidelines outlined in this article, you can successfully connect your CNC shield with your Arduino and be on your way to creating amazing projects.
First, make sure you have all the necessary components, including an Arduino board, CNC shield, and stepper motor drivers. Then, carefully follow the wiring diagram to connect everything together correctly. Finally, upload the appropriate firmware to your Arduino and test your CNC machine to ensure it is functioning properly.
By taking the time to properly connect your CNC shield with your Arduino, you can unlock the full potential of your CNC machine and create intricate designs with ease. Don’t be afraid to experiment and try new things – the possibilities are endless!
Request a quote today!
[contact-form-7 id="1578" title="Contact form"]
Please compress the file into a ZIP or RAR file before uploading. Alternatively, send through your RFQ by email.
enquires@unitymanufacture.com


