Table of Contents
- Connecting a Plasma Cutter to a CNC: A Step-by-Step Guide
- Step 1: Check Your Equipment
- Step 2: Choose the Right Plasma Cutter
- Step 3: Connect the Plasma Cutter to the THC Unit
- Step 4: Connect the THC Unit to the CNC Machine
- Step 5: Install the Necessary Software
- Step 6: Configure the CNC Software
- Step 7: Test the Connection
- Step 8: Adjust Your Settings as Needed
- Step 9: Begin Cutting
- Step 10: Clean and Maintain Your Equipment
- Frequently Asked Questions
Connecting a plasma cutter to a CNC machine can be a daunting task, especially for those without experience in the field. However, with the right guidance, it can be a straightforward and relatively simple process. In this article, we will explore the steps required to connect your plasma cutter to a CNC machine, and provide some tips and tricks to ensure a successful connection.
Whether you’re a seasoned CNC user or just starting out, understanding how to connect a plasma cutter to your machine is a valuable skill that can save you time and money. By following the steps outlined in this article, you’ll be able to connect your plasma cutter to your CNC machine with ease, and be well on your way to producing high-quality cuts in no time. So, let’s dive in and get started!
To connect a plasma cutter to CNC, follow these simple steps:
- Attach the plasma cutter to the CNC machine using a compatible cable.
- Connect the plasma cutter’s power source to an external power supply.
- Set up the CNC software to control the plasma cutter.
- Ensure that the CNC machine and plasma cutter are properly grounded for safety.
- Test the connection by running a sample program.
Connecting a Plasma Cutter to a CNC: A Step-by-Step Guide
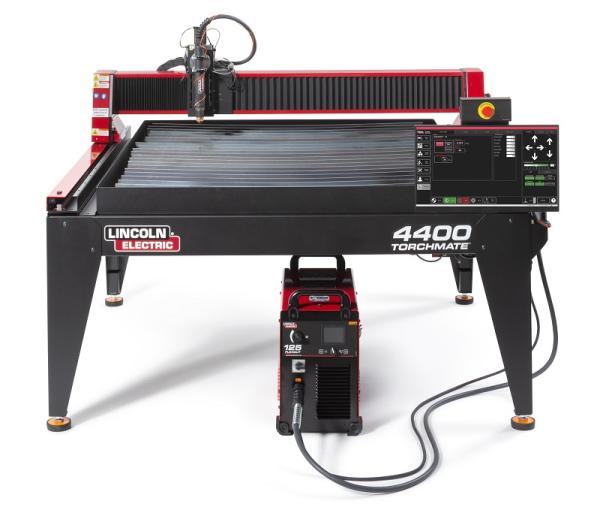
Plasma cutting technology has revolutionized the manufacturing industry, allowing for precise cuts in a wide range of materials. By connecting a plasma cutter to a CNC (Computer Numerical Control) machine, you can take this precision to the next level, ensuring that every cut is exactly as intended. In this article, we’ll take you through the process of connecting a plasma cutter to a CNC machine in 10 easy steps.
Step 1: Check Your Equipment
Before you begin, it’s important to make sure that you have all the necessary equipment. This includes a plasma cutter, a CNC machine, a power source, a control cable, and a torch height control (THC) unit. You should also have a set of instructions for both your plasma cutter and CNC machine, as well as any necessary software.
Benefits of a Plasma Cutter-CNC Connection
– Improved accuracy and precision in cuts
– Reduced material waste
– Increased efficiency and productivity
Step 2: Choose the Right Plasma Cutter
Not all plasma cutters are created equal. When selecting a plasma cutter for use with a CNC machine, you’ll want to choose one that is capable of producing the necessary power output and has a compatible interface. Look for plasma cutters with a high amperage output and an interface that allows for connection to a CNC machine.
Plasma Cutter Vs Laser Cutter
While both plasma cutters and laser cutters can be used with a CNC machine, plasma cutters are generally better suited for cutting thicker materials, while laser cutters are better for thin materials. Plasma cutters are also typically faster and more affordable than laser cutters.
Step 3: Connect the Plasma Cutter to the THC Unit
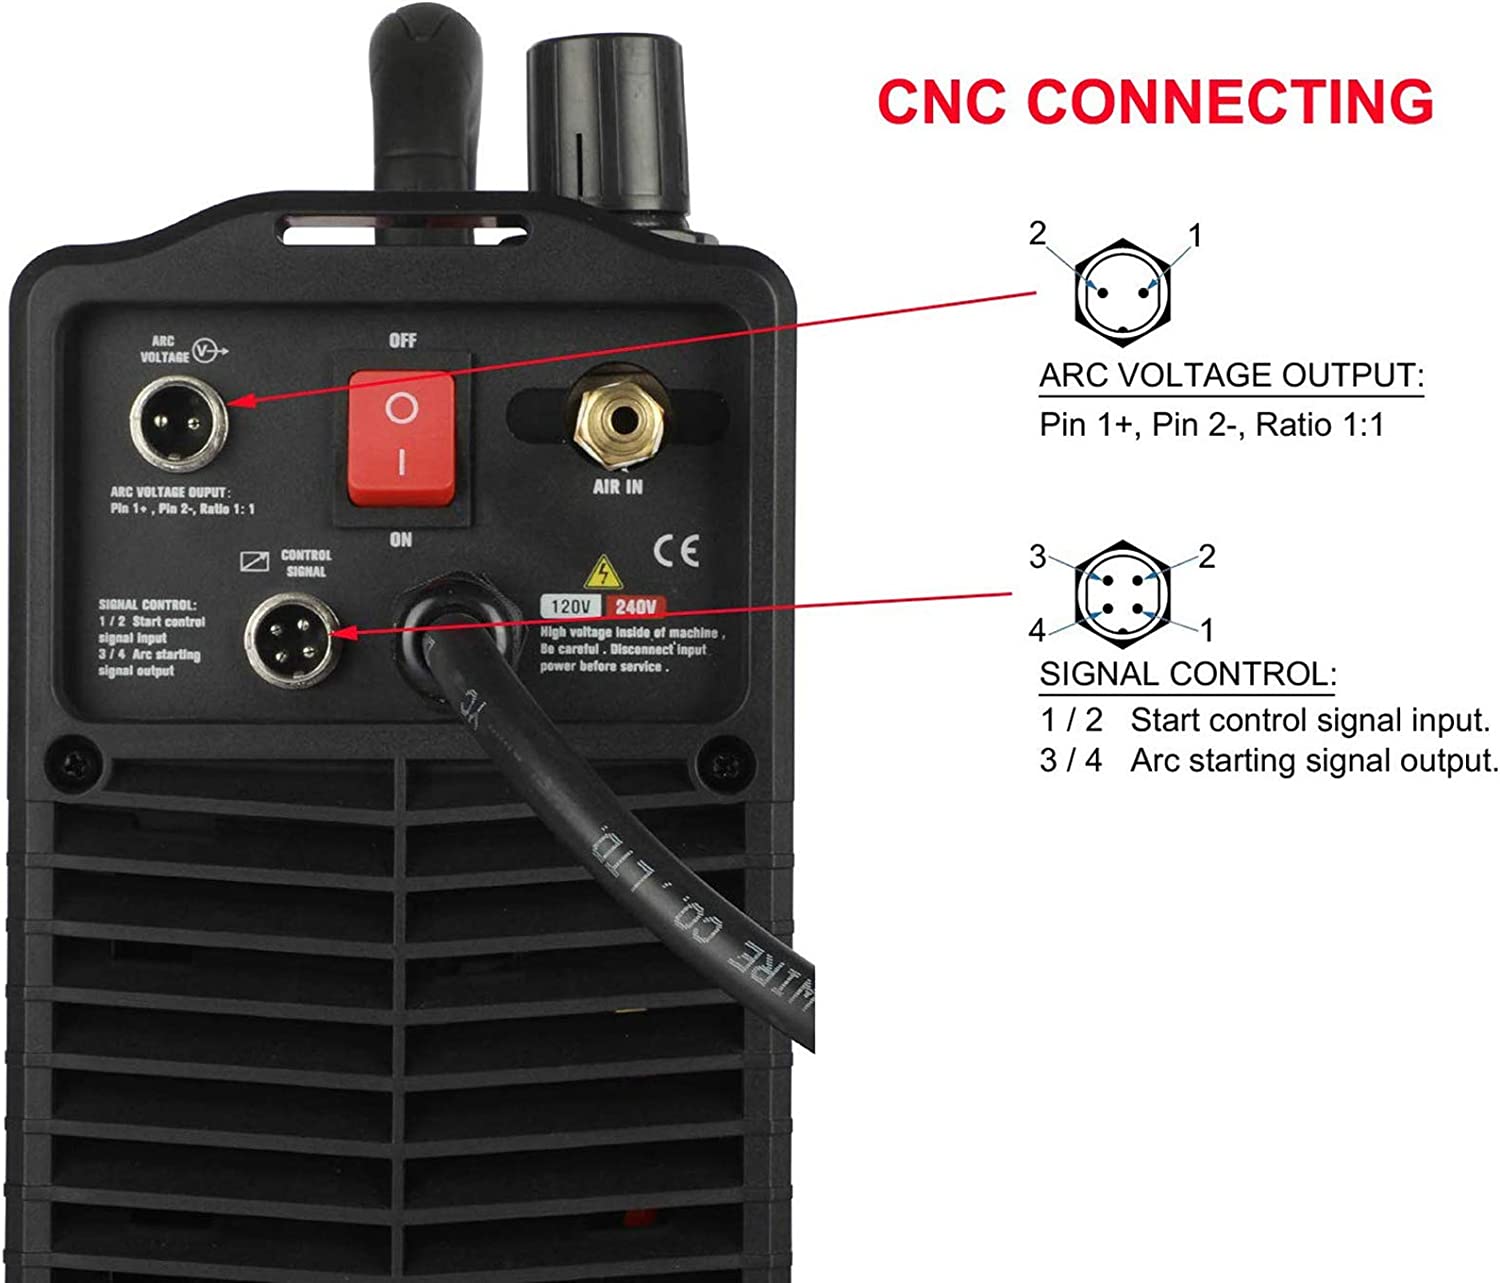
The torch height control (THC) unit is an essential component of any plasma cutter-CNC connection. It ensures that the torch is positioned at the correct height above the material being cut, which is critical for achieving accurate cuts. Connect the plasma cutter to the THC unit using the control cable provided.
THC Unit Vs Manual Torch Height Control
While manual torch height control is an option, it can be difficult to achieve the necessary precision, particularly when cutting thicker materials. A THC unit takes care of this for you, ensuring that the torch is always at the optimal height for the best possible cut.
Step 4: Connect the THC Unit to the CNC Machine
Next, connect the THC unit to the CNC machine using the control cable provided. This will allow the CNC machine to communicate with the plasma cutter and THC unit, ensuring that the torch height is adjusted automatically based on the cutting parameters set in the CNC software.
THC Unit Vs Z-Axis
Some CNC machines have a built-in Z-axis control that can be used instead of a THC unit. However, a dedicated THC unit is generally more accurate and reliable, particularly when cutting thicker materials.
Step 5: Install the Necessary Software
In order to use your plasma cutter with your CNC machine, you’ll need to install the necessary software. This may include software for the plasma cutter itself, as well as software for the CNC machine. Be sure to follow the instructions carefully and ensure that all software is properly configured.
Benefits of CNC Plasma Cutting Software
– Improved precision and accuracy
– Reduced setup time
– Increased efficiency and productivity
Step 6: Configure the CNC Software
Once the software is installed, you’ll need to configure it to work with your plasma cutter. This may involve setting up cutting parameters such as amperage, voltage, and gas flow, as well as adjusting the torch height control settings. Be sure to consult the software manual for detailed instructions.
CNC Software Vs Manual Control
While manual control is an option, it can be time-consuming and prone to errors. CNC software allows for precise control over cutting parameters, ensuring that every cut is exactly as intended.
Step 7: Test the Connection
Before you begin cutting, it’s important to test the connection between your plasma cutter and CNC machine. This will ensure that everything is working properly and that your settings are correctly configured. Test the connection by running a trial cut on a scrap piece of material.
Benefits of Testing the Connection
– Ensures accuracy and precision
– Reduces the risk of damage to equipment or materials
– Saves time and money in the long run
Step 8: Adjust Your Settings as Needed
Based on the results of your test cut, you may need to adjust your settings for optimal performance. This may include adjusting the cutting speed, amperage, voltage, or gas flow. Be sure to consult the software manual for guidance on making adjustments.
Safety Considerations
Always wear appropriate safety gear when using a plasma cutter, including gloves, eye protection, and a respirator. Ensure that your work area is properly ventilated and that all equipment is properly grounded.
Step 9: Begin Cutting
Once you’ve completed all of the necessary setup and testing, you’re ready to start cutting. Be sure to monitor the cutting process closely and make any necessary adjustments as you go. With a plasma cutter-CNC connection, you can achieve precise, accurate cuts in a fraction of the time it would take with manual cutting methods.
Cutting with a Plasma Cutter-CNC Connection Vs Manual Cutting
– Improved accuracy and precision
– Faster cutting times
– Reduced material waste
Step 10: Clean and Maintain Your Equipment
After you’ve finished cutting, it’s important to clean and maintain your equipment to ensure optimal performance and longevity. This may include cleaning the torch and THC unit, replacing consumable parts as needed, and performing routine maintenance tasks.
Benefits of Proper Equipment Maintenance
– Extended equipment lifespan
– Improved performance and efficiency
– Reduced risk of equipment failure or damage
In conclusion, connecting a plasma cutter to a CNC machine is a fairly straightforward process that can have a significant impact on your manufacturing capabilities. By following these 10 steps, you can achieve precise, accurate cuts in a fraction of the time it would take with manual cutting methods. Be sure to carefully follow all instructions and take appropriate safety precautions to ensure optimal performance and safety.
Frequently Asked Questions
Here are some frequently asked questions about connecting a plasma cutter to CNC:
What is a plasma cutter?
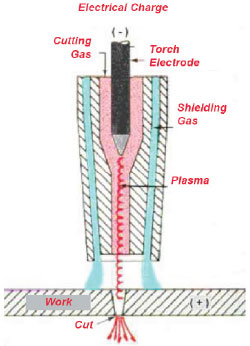
A plasma cutter is a type of tool used to cut through metal. It uses a high-velocity jet of ionized gas, or plasma, to melt and sever through the metal. This type of cutter is often used for industrial and metalworking applications, as it is capable of cutting through thick metal quickly and accurately.
When used in conjunction with a CNC machine, a plasma cutter can be programmed to make precise cuts and designs automatically. This can save time and increase efficiency in a manufacturing setting.
How do I connect a plasma cutter to a CNC machine?
The process for connecting a plasma cutter to a CNC machine will vary depending on the specific equipment being used. However, there are a few general steps that are typically involved:
First, make sure that the plasma cutter and CNC machine are compatible with each other. This may require purchasing additional adapters or cables.
Next, connect the plasma cutter to the CNC machine using the appropriate cables and connections. This may involve connecting the plasma cutter’s control unit to the CNC machine’s control system.
Finally, configure the CNC machine’s software to recognize the plasma cutter and integrate it into the manufacturing process.
What are the benefits of using a plasma cutter with a CNC machine?
Using a plasma cutter in conjunction with a CNC machine can offer several benefits, including:
– Increased precision: A CNC machine can be programmed to make precise cuts automatically, resulting in more accurate and consistent cuts.
– Faster production: With a plasma cutter and CNC machine, parts can be cut quickly and efficiently, reducing the time required for manufacturing.
– Versatility: Plasma cutters can cut through a variety of materials, including steel, aluminum, and copper. This makes them a versatile tool for many different manufacturing applications.
What safety precautions should I take when using a plasma cutter with a CNC machine?
When using a plasma cutter with a CNC machine, it is important to take the following safety precautions:
– Wear appropriate protective gear, such as gloves, eye protection, and a face shield.
– Ensure that the work area is well-ventilated, as plasma cutters can produce harmful fumes and gases.
– Follow all manufacturer’s instructions and guidelines for operating the plasma cutter and CNC machine.
– Make sure that the plasma cutter and CNC machine are properly grounded to prevent electrical hazards.
What maintenance is required for a plasma cutter used with a CNC machine?
Maintenance requirements for a plasma cutter used with a CNC machine will vary depending on the specific equipment being used. However, some general maintenance tasks may include:
– Regularly cleaning the plasma cutter and CNC machine to prevent buildup of debris and dust.
– Checking and replacing consumable parts, such as nozzles and electrodes, as needed.
– Calibrating the plasma cutter and CNC machine to ensure accurate and consistent cuts.
– Following all manufacturer’s recommended maintenance procedures and schedules.
In conclusion, connecting a plasma cutter to CNC can be an intimidating task for beginners, but with the right tools and guidance, it can be a simple process. By following the steps outlined in this guide, you can effectively connect your plasma cutter to CNC and start producing precise cuts in no time.
One important thing to keep in mind is to always prioritize safety when working with plasma cutters. This means wearing the appropriate protective gear, ensuring the machine is properly grounded, and following all manufacturer instructions.
Additionally, it’s important to regularly maintain and calibrate your plasma cutter to ensure it’s functioning at its best. This can help prolong the lifespan of the machine and produce consistent, high-quality cuts.
Overall, connecting a plasma cutter to CNC requires attention to detail and patience, but the end result is a powerful cutting tool that can greatly enhance your fabrication capabilities. So, get started today and see the benefits of this technology for yourself!
Request a quote today!
[contact-form-7 id="1578" title="Contact form"]
Please compress the file into a ZIP or RAR file before uploading. Alternatively, send through your RFQ by email.
enquires@unitymanufacture.com


