Table of Contents
Do you want to create stunning 3D designs for your CNC router? If so, you’ve come to the right place. In this guide, we will take you through the step-by-step process of making 3D designs that are sure to impress.
Whether you’re an experienced CNC router user or just getting started, this guide will provide you with the knowledge and skills to make your own 3D designs. So, grab your computer, fire up your software, and let’s get started on this exciting journey of 3D design for CNC routers.
- Choose a 3D design software that supports CNC router machines like Autodesk Fusion 360, Vectric Aspire, or Sketchup.
- Create your 3D design using the software’s tools and features.
- Check for any potential issues like intersecting lines or non-manifold geometry.
- Export your design as an STL file.
- Open your CNC router software and import the STL file.
- Select the appropriate cutting tools and materials.
- Start the CNC router to begin the cutting process.
How to Make 3D Design for CNC Router?
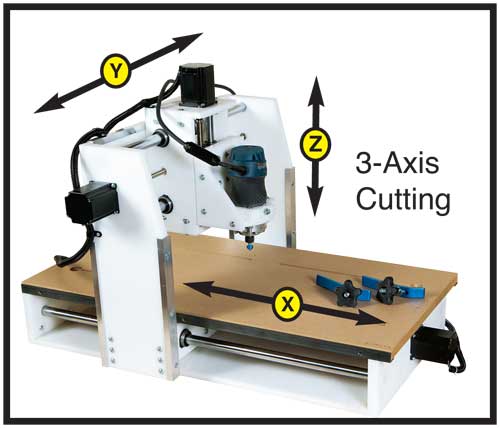
Three-dimensional (3D) designs are widely used in the manufacturing industry, and the CNC router is one of the most popular machines used to create these designs. A CNC router is a computer-controlled cutting machine that is used to cut a wide range of materials with precision. In this article, we will discuss how to make 3D designs for CNC routers, step-by-step.
1. Choose Your Design Software
The first step in creating a 3D design for your CNC router is to choose your design software. There are many different software options available, but some of the most popular include AutoCAD, SolidWorks, and Fusion 360. Each software has its pros and cons, so it’s important to choose the one that best suits your needs and skill level.
Once you have chosen your software, you can start creating your 3D design. This typically involves creating a 3D model of your design using various tools and techniques available in the software.
2. Import Your Design into CAM Software
Once you have created your 3D design, you will need to import it into Computer-Aided Manufacturing (CAM) software. CAM software is used to generate toolpaths that will be used by the CNC router to cut your design. Some popular CAM software options include VCarve Pro, Aspire, and ArtCAM.
When importing your design into CAM software, you will need to specify the cutting parameters and toolpaths that you want to use. This will typically involve selecting the type of cutting tool you will be using, the feed rate, and the depth of cut.
3. Generate Your G-Code
After you have specified your cutting parameters and toolpaths in CAM software, you can generate your G-Code. G-Code is a programming language that is used to control CNC machines. It is used to tell the CNC router how to move the cutting tool during the cutting process.
Generating G-Code typically involves running a post-processor in your CAM software. The post-processor will take the toolpaths and cutting parameters that you have specified and generate the G-Code that the CNC router will use.
4. Load Your G-Code into Your CNC Router
Once you have generated your G-Code, you can load it into your CNC router. This typically involves connecting your computer to the CNC router and using software to transfer the G-Code to the machine.
Before you start cutting, it’s important to make sure that your CNC router is properly set up and calibrated. This typically involves setting the workpiece height, zeroing the machine, and making sure that the cutting tool is properly aligned.
5. Start Cutting
Once your CNC router is set up and calibrated, you can start cutting your 3D design. The cutting process will typically involve moving the cutting tool along the toolpaths that you have specified in your G-Code.
It’s important to monitor the cutting process carefully to make sure that everything is going smoothly. If you notice any issues, such as the cutting tool cutting too deeply or not deeply enough, you may need to adjust the cutting parameters or toolpaths in your CAM software and regenerate your G-Code.
6. Finishing Your Design
Once your cutting is complete, you may need to do some finishing work to your design. This can involve removing any excess material, sanding or polishing the surface, or applying a finish such as paint or varnish.
It’s important to take your time with this step to ensure that your design looks as good as possible. Depending on the complexity of your design, this step can take anywhere from a few minutes to several hours.
7. Benefits of Using a CNC Router for 3D Design
There are many benefits to using a CNC router for 3D design. One of the biggest benefits is that it allows you to create complex designs with a high degree of precision. This can be especially useful for creating products that require a high level of accuracy, such as precision parts for machines or intricate decorative objects.
Another benefit of using a CNC router for 3D design is that it allows you to create designs quickly and efficiently. Once you have created your 3D design and generated your G-Code, the CNC router can cut your design in a matter of minutes or hours, depending on the complexity of the design.
8. Vs. Traditional Design Methods
Compared to traditional design methods, such as hand carving or manual milling, using a CNC router for 3D design offers several advantages. One of the biggest advantages is that it allows you to create complex designs with a high degree of precision, which can be difficult or impossible to achieve with traditional methods.
Another advantage of using a CNC router for 3D design is that it allows you to create designs quickly and efficiently. Traditional methods can be time-consuming and require a high degree of skill and experience, while using a CNC router can allow even beginners to create complex designs with ease.
9. Conclusion
In conclusion, making 3D designs for CNC routers involves several steps, including choosing your design software, importing your design into CAM software, generating your G-Code, loading your G-Code into your CNC router, and starting cutting. While the process may seem intimidating at first, with practice and experience, you can create complex and intricate designs with ease using a CNC router.
Using a CNC router for 3D design offers several advantages over traditional design methods, including the ability to create complex designs with a high degree of precision and the ability to create designs quickly and efficiently. Whether you are a professional designer or a hobbyist, a CNC router can be a valuable tool for creating beautiful and intricate designs.
References:
Frequently Asked Questions
Here are some frequently asked questions about how to make 3d Design for CNC Router:
What software can I use to create 3D designs for my CNC router?
There are many software options available for creating 3D designs for CNC routers. Some popular choices include AutoCAD, Blender, Fusion 360, and SketchUp. Each software has its own strengths and weaknesses, so it’s important to find the one that best suits your needs and experience level. Some software may be free or have a trial version, while others require a purchase.
When creating a 3D design for CNC router, it’s important to keep in mind the limitations of your machine and the materials you will be using. You should also consider the level of detail you want to achieve, as this will affect the complexity of your design.
How can I ensure that my 3D design is suitable for CNC routing?
Before sending your design to the CNC router, you should check that it is suitable for routing. This means ensuring that the design is properly scaled and that there are no intersecting or overlapping lines. You should also check that the design is in a format that can be read by the CNC router software.
To ensure that your design is suitable for CNC routing, it’s a good idea to create a test run on a small piece of material before starting the full project. This will give you an idea of how the design will look and allow you to make any necessary adjustments.
What materials can I use with my CNC router?
CNC routers can be used with a wide range of materials, including wood, plastic, and metal. The type of material you choose will depend on the requirements of your project, as well as the capabilities of your CNC router.
When selecting a material for your CNC router project, it’s important to consider factors such as strength, durability, and cost. Some materials may require specialized tooling or processes to work with a CNC router, so be sure to research your options carefully.
What is the best way to prepare my material for CNC routing?
Preparing your material for CNC routing involves several steps, including cutting the material to the appropriate size, securing it to the CNC router bed, and setting the appropriate cutting depth.
To ensure that your material is properly prepared for CNC routing, it’s important to follow the manufacturer’s instructions and use the appropriate tools and techniques. You should also take care to avoid damaging the material or the CNC router during the preparation process.
How can I optimize my CNC router settings for my project?
Optimizing your CNC router settings for your project involves several factors, including the type of material you are using, the level of detail in your design, and the capabilities of your CNC router.
To optimize your CNC router settings, you should experiment with different cutting speeds, bit types, and feed rates. You should also consider the depth of cut and the direction of the cutting path. By fine-tuning these settings, you can achieve the best possible results for your CNC router project.
In conclusion, learning how to make 3D designs for CNC routers is a valuable skill that can lead to endless possibilities in the world of manufacturing and design. With the right tools and techniques, you can create intricate and precise designs that were once impossible to achieve.
Remember to start with a clear idea and plan before diving into the design process. Take advantage of 3D modeling software to bring your ideas to life and make adjustments along the way.
As you gain experience and confidence, don’t be afraid to experiment and push the boundaries of what’s possible. With dedication and practice, you can master the art of 3D design for CNC routers and bring your creative vision to life.
Request a quote today!
[contact-form-7 id="1578" title="Contact form"]
Please compress the file into a ZIP or RAR file before uploading. Alternatively, send through your RFQ by email.
enquires@unitymanufacture.com


