Table of Contents
CNC routers are versatile machines that can help you cut and shape various materials with precision. But what if you want to take it a step further and add a laser to your CNC router? By doing so, you can expand its capabilities and enhance its functionality.
Adding a laser to your CNC router may sound daunting, but with the right tools and knowledge, anyone can do it. In this guide, we’ll take you through the steps you need to follow to successfully add a laser to your CNC router. So, whether you’re a DIY enthusiast or a professional woodworker, read on to find out how you can take your CNC router to the next level.
Adding a laser to a CNC router requires a few steps. Here’s how you can do it:
- Get a laser module that is compatible with your CNC router.
- Install the laser module onto the CNC router’s spindle mount.
- Connect the laser module to the CNC router’s control board.
- Configure the CNC router’s software to recognize the laser module.
- Calibrate the laser module to ensure accurate cutting or engraving.
Adding laser capability to a CNC router can greatly expand its capabilities and increase the range of materials that can be worked on. While this process may seem daunting, it is actually relatively straightforward, especially if you have some experience with electronics and programming. In this article, we will walk you through the steps required to add a laser to your CNC router.
H2: What You Need to Add Laser to CNC Router
Before we get started, here is a list of the things you will need to add a laser to your CNC router:
1. A CNC router with a compatible controller board
2. A laser module
3. A laser driver board
4. A power supply for the laser
5. Wires and cables for the connections
6. Safety glasses
H3: Choose the Right Laser Module
The first step in adding a laser to your CNC router is to choose the right laser module. There are many different types of laser modules available, each with its own specifications and capabilities. Some of the factors you should consider when choosing a laser module include power output, wavelength, and beam shape.
When selecting a laser module, it is important to choose one that is compatible with your CNC router’s controller board. You should also consider the materials you will be working with and choose a laser with a power output that is appropriate for your needs.
H3: Install the Laser Driver Board
Once you have chosen a laser module, the next step is to install the laser driver board. The laser driver board is responsible for controlling the laser module and ensuring that it operates safely and efficiently.
To install the laser driver board, you will need to connect it to the controller board using wires and cables. The exact process will depend on the specific boards you are using, so be sure to consult the manufacturer’s instructions.
H3: Connect the Laser Module
After installing the laser driver board, you can connect the laser module to your CNC router. This will typically involve connecting wires from the laser module to the laser driver board.
Be sure to follow the manufacturer’s instructions carefully when making these connections, as improper wiring can lead to damage to the laser module or other components.
H3: Install the Power Supply
The laser module will require a separate power supply to operate. This power supply should be rated to provide the appropriate voltage and current for your laser module.
To install the power supply, you will need to connect it to the laser driver board using wires and cables. Again, be sure to follow the manufacturer’s instructions carefully when making these connections.
H3: Configure the CNC Router Software
Once the hardware components are installed and connected, you will need to configure the software that controls your CNC router. This will typically involve adding a new tool to the tool library and configuring the settings for the laser module.
The exact process will depend on the software you are using, so be sure to consult the documentation or seek assistance from the manufacturer or online community.
H3: Test the Laser
Before using the laser to cut or engrave any materials, it is important to test it thoroughly to ensure that it is operating safely and correctly. This will involve running test patterns and adjusting the settings as needed.
It is also important to wear appropriate safety glasses when using the laser, as the laser beam can cause permanent eye damage.
H3: Benefits of Adding Laser to CNC Router
Adding a laser capability to your CNC router can greatly expand its capabilities and increase the range of materials that can be worked on. With a laser, you can cut and engrave a wide variety of materials, including wood, plastic, metal, and even glass.
In addition, lasers offer greater precision and accuracy than traditional cutting and engraving methods, allowing you to create intricate designs and patterns with ease.
H3: Laser vs. Traditional Cutting and Engraving
Compared to traditional cutting and engraving methods, lasers offer several advantages. First and foremost, lasers can cut and engrave a wider range of materials than traditional methods, including materials that are too hard or brittle for traditional tools.
In addition, lasers offer greater precision and accuracy, allowing you to create intricate designs and patterns with ease. Finally, lasers are generally faster than traditional methods, allowing you to complete your projects more quickly and efficiently.
H3: Conclusion
Adding a laser to your CNC router is a great way to expand its capabilities and increase the range of materials that you can work with. While the process may seem daunting at first, it is actually relatively straightforward, especially if you have some experience with electronics and programming.
By following the steps outlined in this article and taking appropriate safety precautions, you can add a laser capability to your CNC router and start creating amazing projects today!
Frequently Asked Questions
Adding a laser to a CNC router can enhance its capabilities and allow for more precise cutting and engraving. However, it can be a complicated process. Here are some commonly asked questions and answers about how to add a laser to a CNC router.
What is a laser for a CNC router?
A laser for a CNC router is a module that can be added to the machine to allow for laser cutting and engraving. It typically consists of a laser diode, a lens, and a driver board. The laser is mounted on the CNC router and can be controlled by the machine’s software.
Adding a laser to a CNC router can be a complex process, and it is important to follow the manufacturer’s instructions carefully. It typically involves installing the laser module, wiring it to the driver board, and making software adjustments to the CNC router’s settings.
What are the benefits of adding a laser to a CNC router?
Adding a laser to a CNC router can provide several benefits, including the ability to cut and engrave a wider range of materials with greater precision. Lasers are particularly useful for cutting and engraving materials like wood, acrylic, and leather, which can be difficult to cut with a traditional router bit.
Laser cutting and engraving can also be faster than traditional cutting methods, which can be beneficial for production applications. Additionally, laser cutting and engraving can produce finer details and smoother edges than traditional cutting methods.
What are some things to consider when adding a laser to a CNC router?
When adding a laser to a CNC router, it is important to consider factors like the laser’s power output, the type of lens being used, and the material being cut or engraved. Different materials require different laser settings, so it is important to experiment with different power levels and speeds to achieve the desired results.
Additionally, it is important to consider safety when using a laser. Lasers can be dangerous if misused, so it is important to wear appropriate eye protection and follow all safety guidelines provided by the manufacturer.
What are some common problems when adding a laser to a CNC router?
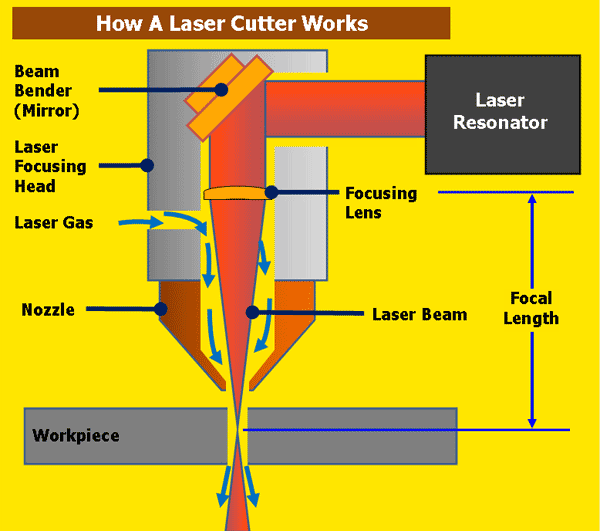
One common problem when adding a laser to a CNC router is getting the laser to focus properly. The lens must be positioned at just the right distance from the material being cut or engraved in order to achieve the desired results. Additionally, the laser’s power output and speed settings may need to be adjusted to achieve the desired results.
Another common problem is ensuring that the laser is properly aligned with the CNC router’s cutting path. This can be a complex process and may require additional software adjustments or hardware modifications.
What are some tips for using a laser with a CNC router?
When using a laser with a CNC router, it is important to start with low power and slow speed settings and gradually increase them until the desired results are achieved. It is also important to experiment with different materials and settings to determine the optimal settings for each application.
Additionally, it is important to keep the laser and lens clean and free of debris, as dust and other particles can interfere with the laser’s performance. Finally, it is important to follow all safety guidelines provided by the manufacturer and to wear appropriate eye protection when using a laser with a CNC router.
In conclusion, adding a laser to your CNC router can greatly enhance its capabilities and expand the range of materials that can be cut or engraved. By following the steps outlined in this guide, you can successfully integrate a laser module into your machine and start creating intricate designs in no time.
While the process may seem daunting at first, with the right tools and a bit of patience, anyone can add a laser to their CNC router. Just be sure to take the necessary safety precautions and double-check your settings before beginning any project.
In the end, the addition of a laser to your CNC router can open up a world of possibilities for your creative projects. So why wait? Start researching laser modules and begin exploring the endless design opportunities that await you with this exciting new addition to your workshop.
Request a quote today!
[contact-form-7 id="1578" title="Contact form"]
Please compress the file into a ZIP or RAR file before uploading. Alternatively, send through your RFQ by email.
enquires@unitymanufacture.com


