Table of Contents
When it comes to metalworking, achieving the right surface finish is essential for both functionality and aesthetics. But how do you know if you’ve achieved the desired surface finish? In this guide, we will walk you through the steps on how to check the surface finish of metal, so you can ensure your work meets the required standards.
Surface finish can greatly impact the performance and durability of metal products. Whether you’re a professional metalworker or simply someone who enjoys DIY projects, understanding how to check the surface finish of metal is an important skill to have. So, let’s dive in and learn how to check surface finish like a pro!
- Clean the surface of the metal thoroughly to ensure accurate results.
- Use a surface roughness tester to measure the roughness average (Ra) of the metal surface. This will give you an idea of the surface finish.
- Compare the Ra value to the specifications provided by the manufacturer to determine if the surface finish meets the required standards.
- Use a visual inspection method to check for any scratches, burrs, or other imperfections on the metal surface.
- If necessary, use a profilometer to measure the surface texture and waviness of the metal surface.
How to Check Surface Finish of Metal?
If you work with metal, you know how important it is to have a smooth surface. Whether you are painting, polishing, or just want a clean look, checking the surface finish is crucial. In this article, we will discuss different ways to check the surface finish of metal and why it is important.
Visual Inspection
Visual inspection is the simplest way to check the surface finish of metal. This method involves examining the surface with your naked eye or with a magnifying glass. You should look for any scratches, dents, or marks on the surface. A smooth surface will reflect light evenly, while a rough surface will scatter the light.
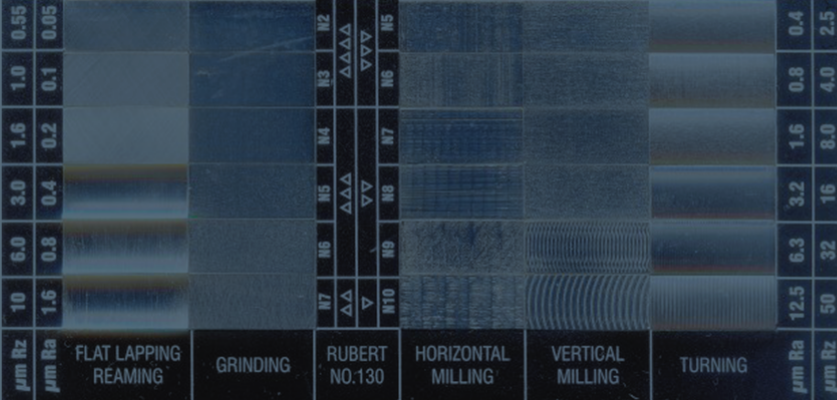
If you need more precise measurements, you can use a surface roughness comparator. This tool has a set of standards that you can compare the surface with. The standards have different textures that range from very rough to very smooth. You can select the standard that matches your surface and compare the two.
Surface Roughness Measurement
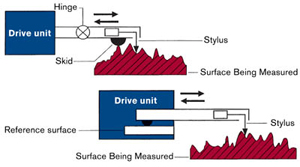
If you need to measure the surface roughness of metal, you can use a surface roughness tester. This tool measures the height of the peaks and valleys on the surface of the metal. The measurement is expressed in terms of Ra, which is the average roughness of the surface.
Ra is a measure of the average deviation of the surface from its ideal form. The smaller the Ra value, the smoother the surface. A Ra value of 0.8 µm or less is considered a good finish for most applications. However, some applications require an even smoother finish, such as those that involve optical or electronic components.
Benefits of Checking Surface Finish
Checking the surface finish of metal is important for several reasons. First, it ensures that the metal meets the required specifications for the application. A rough surface can affect the performance of the metal, especially in applications that involve moving parts or require a seal.
Second, a smooth surface improves the appearance of the metal. If you are painting or polishing the metal, a smooth surface will provide a better finish. It also makes it easier to clean the metal, as dirt and grime are less likely to stick to a smooth surface.
Surface Finish vs Surface Roughness
Surface finish and surface roughness are often used interchangeably, but they are different. Surface finish refers to the overall surface quality of the metal, while surface roughness refers to the micro-geometry of the surface.
Surface finish is usually expressed in terms of a numerical value, such as Ra, Rz, or Rmax. Surface roughness is expressed in terms of the height of the peaks and valleys on the surface. Both are important to consider when evaluating the quality of a metal surface.
Conclusion
Checking the surface finish of metal is important for ensuring that it meets the required specifications and for improving its appearance. Visual inspection is a simple way to check the surface, while surface roughness measurement provides more precise measurements. Understanding the difference between surface finish and surface roughness is also important when evaluating the quality of a metal surface.
Frequently Asked Questions
Here are some frequently asked questions about checking surface finish of metal.
What is Surface Finish of Metal?
Surface finish of metal is a measure of the texture or roughness of the surface of a metal material. It is typically measured in terms of Ra (roughness average) or RMS (root mean square), which are both measures of the average deviation of the surface from its ideal form.
Surface finish can be important for many applications, including aesthetics, corrosion resistance, and functionality. For example, a smooth surface finish can reduce friction and wear, while a rough surface finish can improve adhesion and bonding.
How is Surface Finish Measured?
There are several methods for measuring surface finish of metal, including stylus profilometry, optical profilometry, and interferometry. Each method has its own advantages and disadvantages depending on the application and the type of surface being measured.
Regardless of the method used, the measurement is typically taken over a specified distance (often 0.8 mm) and the data is analyzed to determine the roughness average (Ra) or root mean square (RMS) of the surface.
What Factors Affect Surface Finish of Metal?
There are several factors that can affect the surface finish of metal, including the type of metal, the manufacturing process, and the finishing process. For example, metals that are more ductile (e.g. copper) tend to have a smoother surface finish than metals that are less ductile (e.g. cast iron).
Similarly, the manufacturing process (e.g. casting, forging, machining) and the finishing process (e.g. grinding, polishing, electroplating) can both have a significant impact on the surface finish of metal.
Why is Surface Finish Important in Manufacturing?
Surface finish is important in manufacturing for several reasons. First, it can affect the performance and functionality of the final product. For example, a rough surface finish can increase friction and wear, which can reduce the lifespan of the product.
Second, surface finish can affect the aesthetics of the final product. A smooth and polished surface finish can be more visually appealing than a rough and uneven surface finish. Finally, surface finish can affect the cost of production, as additional finishing processes may be required to achieve the desired surface finish.
How Can Surface Finish be Improved?
There are several methods for improving the surface finish of metal, including grinding, polishing, and electroplating. Grinding and polishing involve removing material from the surface of the metal to create a smoother finish, while electroplating involves adding a layer of material to the surface of the metal to improve its properties.
The specific method used will depend on the type of metal, the desired surface finish, and the manufacturing process. In some cases, multiple methods may be used in combination to achieve the desired surface finish.
In conclusion, checking the surface finish of metal is an essential step in many industries, from manufacturing to construction. By using the proper tools and techniques, you can ensure that your metal surfaces meet the required specifications and are free of defects.
One important tool for checking surface finish is the profilometer, which measures the roughness of a surface in micrometers. By comparing the results to industry standards, you can determine whether your surface finish is acceptable or needs improvement.
Another key technique is visual inspection, which involves examining the surface for scratches, pits, or other imperfections. This can be done using a variety of methods, including magnification, lighting, and contrast enhancement.
Overall, by combining these tools and techniques, you can ensure that your metal surfaces meet the highest standards of quality and performance. Whether you are a manufacturer, builder, or engineer, taking the time to check surface finish is a crucial step in achieving success in your field.
Request a quote today!
[contact-form-7 id="1578" title="Contact form"]
Please compress the file into a ZIP or RAR file before uploading. Alternatively, send through your RFQ by email.
enquires@unitymanufacture.com


